
I love the magic of baking.
Particularly when you cut into a fairly innocuous looking cake, and then get this (or at least something like it):

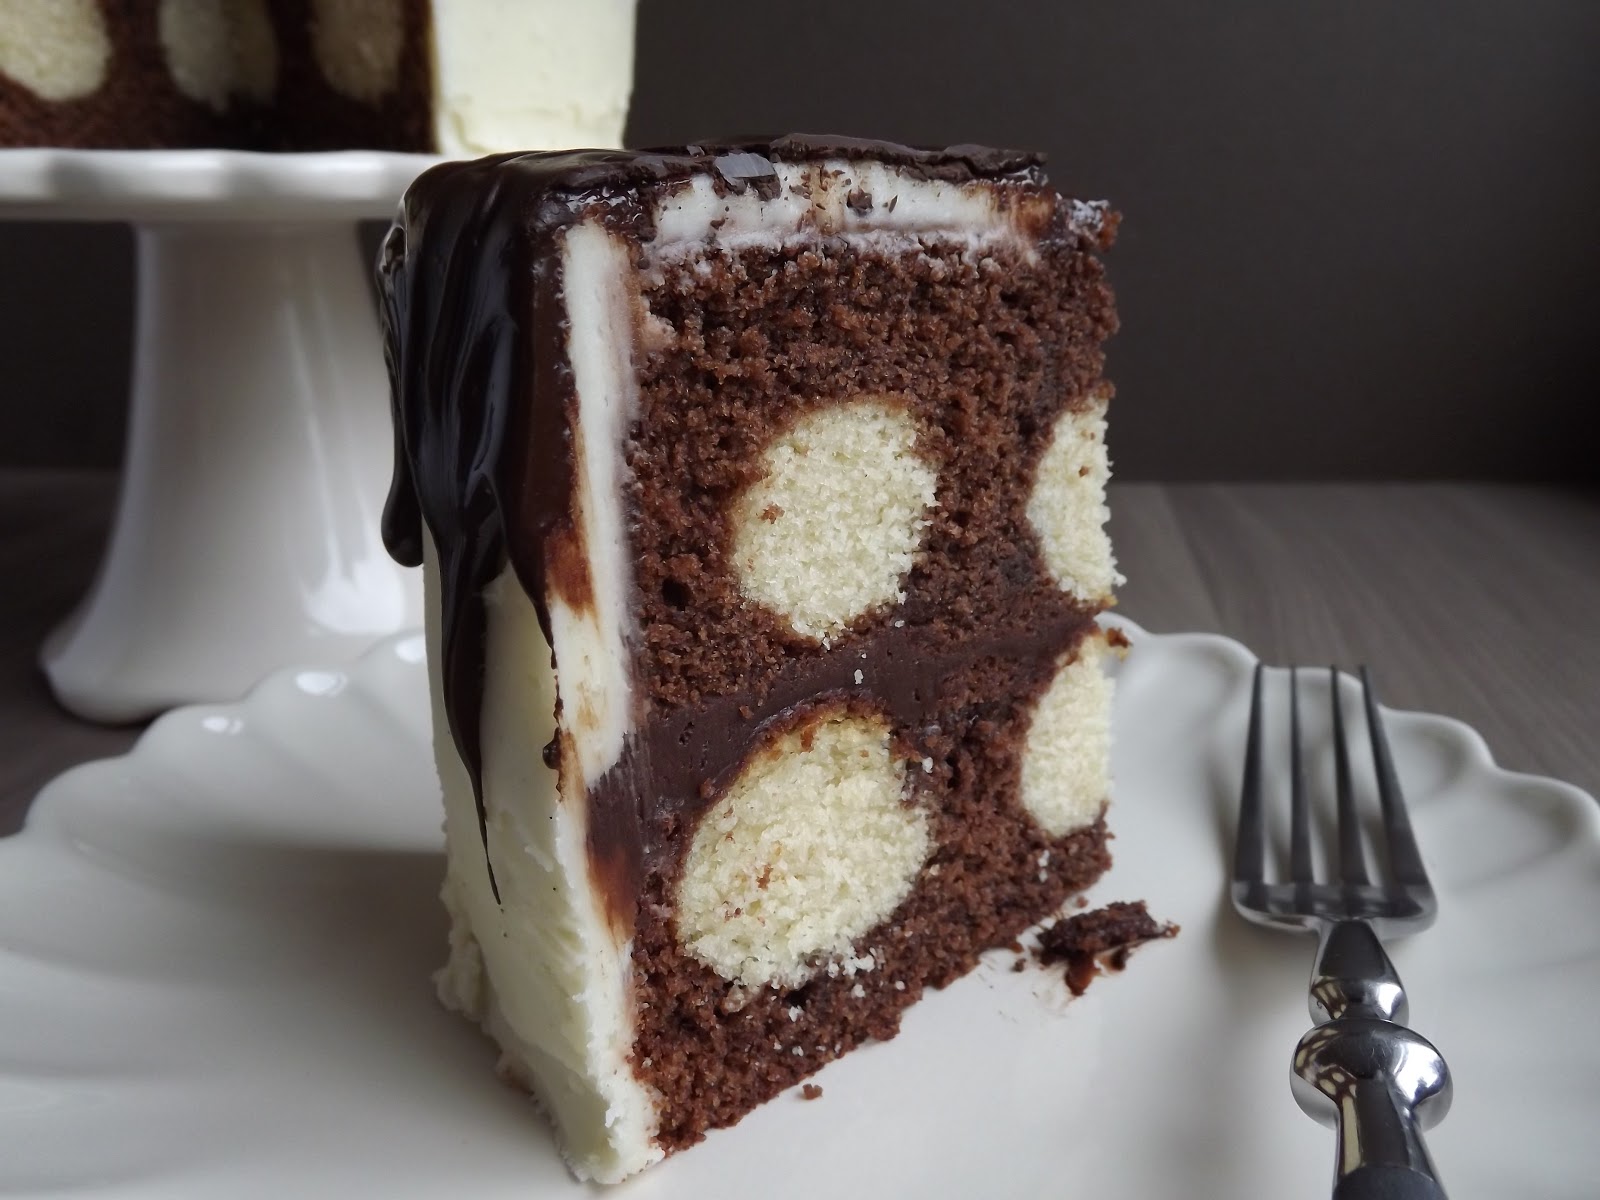
Vanilla flavour polka dots, enrobed in chocolate sponge, sandwiched together with chocolate fudge icing, covered in vanilla buttercream, with a final topping of dark chocolate, dripping down the sides.
And if all that tastes good, too, then I really shouldn't complain.
But, I have to be honest.
This cake did not go entirely to plan. And this is version two. And, if I make it again, I will definitely do some tweaking.
The idea for the cake stemmed from this amazing cake by Deb at Once Upon a Pedestal. It was doing the rounds on Pinterest in January. Someone at work, who knows about my 'hobby' sent me the link.
That was it - I was hooked. I started planning, as the idea of dots in a cake was screaming 'Red Nose Day' at me.
I even ordered a cake pop pan so that I could execute my grand design. (And I hate to say it, but I just don't see the point in cake pops. I love how they look, but it strikes me that you can put all that effort into them and then in two bites, they're gone. So for me to get a cake pop pan, well.)

Anyhoo, sadly, February intervened. And all my thoughts of baking went out of the window.
By the time I had started to venture back into the kitchen, Red Nose Day was looming and I simply didn't feel like attempting it. I wanted simple bakes; real comfort food. And then anyway, Jude at A Trifle Rushed did this amazing version.
So back on the back burner the project went.
I dug it out again briefly at Easter for version one.
Which was a complete fail.
Well, not completely.
I just messed up on the cake pan sizes and, using eight inch pans, didn't have enough dots to fill them. So I scooped the mix and pops all into one and tried baking a single layer cake. And was then fooled by the skewer test (as it must have hit a cake pop, so I thought the cake was more done that it was). Twenty minutes after taking it out of the oven, the centre had collapsed into molten chocolate goo, surrounding some white 'pimples'. The outer edge - which was the only bit properly cooked - tasted nice though. But a bit put off by the experience, I again put it on the back burner.
But it's been niggling away.
This week, buoyed by the sunshine over the weekend, and with a day to myself, I decided to try again. This was the result.
Here's what I did, and what happened.
Chocolate and Vanilla Polka Dot Cake
Ingredients
(makes one six inch layer with some mix left over for marbled cupcakes! #winning!)
Vanilla Polka Dots
100g softened unsalted butter
150g self raising flour
150g caster sugar
2 large eggs
3 tbspns milk
1/2 tspn vanilla extract
Chocolate Sponge
225g softened unsalted butter
200g self raising flour
225g soft light brown sugar
4 medium eggs
1/2 tspn baking powder
4 tbpsns cocoa powder
1 tbspn milk
Chocolate Fudge Icing
Being lazy, I used a tub of Betty Crocker that I had in the cupboard, but you could make your own (and if I had done that, I might not have had one of the issues I had with this cake). The leftovers in the tub went to ice the top of the cupcakes I made, though.
Vanilla Buttercream
150g softened unsalted butter
1 tspn vanilla bean paste
about 250g icing sugar
1 tbspn milk
Chocolate Glaze
100g dark (70%) chocolate, gently melted
Preheat the oven to 160 Fan / 180 Conventional / 350 Fahrenheit / Gas 4. Grease your cake pop pan (I used a 12 pop one from Nordicware which I bought from John Lewis - the cheapest stockist of this one I could find), and grease and baseline 2 six inch (15cm) sponge tins.
To make the cake pops, measure all the ingredients into a bowl, and blitz with a hand mixer until you have a smooth batter and everything is combined. Spoon into the pan, so that the bottom spheres are full - the cake will rise up into the top spheres to give the ball shaped 'dots'.
Bake in the oven for about 12 minutes. (Try not to over bake at this stage, as they are going to be baked again in the sponge.) Remove, allow to cool, and then gently remove from the tin (I found a dessert spoon perfect for helping me to prise them out without breaking).

For the chocolate sponge, again,measure all the ingredients into a bowl and blitz with a hand mixer, until you have a smooth batter. Scoop enough mix to give a thin layer in the base, and then arrange your vanilla dots.

Scoop some more chocolate sponge over and around the dots, but try not to overfill. I found this really hard to judge, as you want to try and cover the cake pops, yet not have it explode over the top of the tins.Here's what mine looked like:

Bake in the centre of the oven. Ordinarily, a normal two layer sponge made with this mix would take me just under 25 minutes. But, with the dots, it seems that the heat doesn't permeate through the mix in the same way. Bearing in mind what happened the first time I tried this, I kept checking the cake every few minutes until a skewer inserted into the chocolate sponge did come out clean. In all, the baking took just under 40 minutes. It then looked like this:

There was a slight 'lip' over the top edge of the cake tin, which you can see looks a little crusty. I really needed a slightly deeper tin (maybe 3 inch deep) to contain all the mix while trying to make sure the balls were covered. But they had risen a little bit, too, and floated nearer to the top of the cake. Anyway, I let the cakes cool completely in their tins, and when I turned them out, I carefully tried to cut away the crusty bits.

Once they were cooled, I sandwiched them together using the Betty Crocker chocolate frosting. In hindsight, this was a little too soft for the job, and it would have been better with a homemade chocolate ganache. I'd used it as I was running out of time, and I had it in the cupboard. Knowing it tasted good, and that it would mean that the layer through the cake would be chocolate brown - the same colour as the sponge - I thought I'd give it a go.
To make the vanilla frosting, cream the butter and vanilla together using stand mixer with a paddle attachment. Add the icing sugar and blend well. If it seems a little dry, you can slacken it again with a little milk.

Unfortunately, even though I chilled the cake for a little, when I applied the vanilla frosting as a crumb coat, the chocolate icing was still too soft, and managed to meld with the vanilla to make a fairly muddy looking cake. At this point I chilled it, so that it would be ready to apply the final vanilla layer. I tried to do this as neatly as possible, but my buttercream was a little thick at this stage, so it splodged rather than glided on. I also could still make out the layer of chocolate icing showing through the vanilla.
By this point, I'd started to give up, so I just chilled the cake in the fridge overnight.

The next day, I melted some chocolate and draped it over the top of the cake, trying to tease it so that it would drip down the sides. Just the chocolate on its own was really a little too thick.
What I should have done, was to make up a ganache mix (ie added some cream), so that it had a little fluidity and was easier to pour. The chocolate does set up though, and so gives a lovely, crackly layer to the top. (I was a little impatient and cut into it before the choc had fully set - there were some oozy bits of melted choc as a result.)
The finished cake cut really well, and both the chocolate and vanilla sponges were dense, but still soft (even the cake pops which of course had had a longer baking time). The vanilla and chocolate together gave a nice flavour, with the bitterness from the dark chocolate adding a different note. Mike and Josh felt it was very sweet, so a small portion worked best for them.

As I had some left over vanilla and chocolate batters, I made up some marbled cupcakes and used the remainder of the tub of chocolate fudge icing to decorate. Josh really liked these, and they appealed to his teenage appetite.
So what would I do next time?
- place a very thin layer of mix in the base of the cake tin so it doesn't push the pops up too much;
- make sure I have enough pops for the size of tin - six for a six inch (15cm tin), more for an eight inch (20cm) tin;
- line up the pops in each layer as neatly as possible to get a balanced view when you cut into the cake;
- scoop the batter over the pops so it falls down the sides, rather than try and fill the gaps then smooth it over the pops;
- not overfill the tin (or use a slightly deeper tin);
- make my own ganache filling (and topping) and make sure I don't push it right to the edge of the layers;
- make the vanilla buttercream slightly thinner so it glides on properly.

This would be an absolutely fantastic cake for a child's birthday though, so with Sam in mind (hell, who am I kidding, it's my birthday in a couple of weeks), I'll definitely be trying it again.
I might just go for coloured polka dots next time.
Susie
What an absolutely delightful looking cake Susie- all the hard work and effort completely worth it to have such a stunning looking bake! And thank you for all the tips for those of us who maybe brave enough to attempt something similar!
ReplyDeleteThank you Kate - that's very kind. :)
DeleteWow - a showstopper! Love how in the first photo it almost looks like a cartoon cake with such thick smooth frosting!
ReplyDeleteGreat idea to use the cake pop sponges (I don't really get cake pops either - but then I'm not really one for decoration) - my question is whether the cake pop sponge was hard having been twice baked?
Hi CC - I'd only just cooked the cake pops so they were still really soft and fragile. By the time the cake was cooked, they were a little firmer, but certainly not hard. As ever, timing is everything, I think!
DeleteSUCH a lot of hard work but clearly well worth it... what an INCREDIBLE cake... well done... now send me a slice dear!
ReplyDeleteThanks Dom! :)
DeleteLove love love this cake! I loved it on twitter and I love it a little more again now! I don't get the whole cake pop thing at all, but I'm a sucker for a hidden picture cake, and may need to invest in a pan soon (and before they fall spectacularly out of fashion again ;-) ) thanks for sharing, and none of the flaws you mentioned are visible in the pictures at all x
ReplyDeleteThanks Victoria x
DeleteMy goodness Susie, that is one stunner of a cake. I couldn't begin to imagine how you did it until I read through your post, it's very clever. To be honest, it looks a real stunner even before you see what's inside. I never thought I'd say I might make cake pops, but I'm having a rethink now.
ReplyDeleteThanks Choclette - I thought it was a brilliant idea when I saw it. The multicoloured version Debs did looks very effective! :)
DeleteI love this polka dot cake, it is so cute. I am like Choclette, I was wondering how you made the polka dots, very clever.
ReplyDeleteThanks Dawn. I do wish I'd thought of it! :)
DeleteWhat a stunning cake! Worth the effort as the end result is certainly impressive. Good tips.
ReplyDeleteThanks Denise :)
DeleteWow Susie this looks amazing! I'm obsessed with polka dots and throw chocolate into the mix and it has my name written all over it! Love the look of that fudge stuff dripping over the sides...I'm drooling at my screen right now!
ReplyDeleteThanks Gem, glad you like it! :)
DeleteWonderful results Susie! Thanks for giving the tutorial a try.
ReplyDeleteHappy Caking!
Hello Deborah - thank you for the comment, and for the idea in the first place! :) My colleague was raving about your cake, so I had to give it a go. It's a brilliant idea and your instructions were very clear. :)
DeleteWow!! I am speechless. I too wondered how you made the polka dots - so clever! I have a cake pop tin which I've never used and this will be it's first outing. It really shows that perseverance pays off - thanks for sharing all your tips, I'm definitely giving this a go!
ReplyDeleteThanks Ros! Well, have fun - if anyone can do one then you can! :)
Deletestunning...this would have looked fab in GBBO hidden design cake S3 ep1!
ReplyDeleteThe feeling of all the hard work looking + tasting amazing is fab!!
well done u. x
Thanks - glad you like it! :)
DeleteSusie, if you hadn't revealed your mistakes I am pretty sure that none of us would've picked up on them! Your cake looks incredible, and the Betty Crocker buttercream actually worked really well to 'sandwich' the cakes together. From the first photo you can hardly tell that there are two separate sponge layers :) I'm new to your blog and just want to say that your baking tutorials are fantastic... plus, you really have a knack for food styling and photography! Thanks for sharing your experience with this cake. It's gorgeous x
ReplyDeleteThank you Laura, that's incredibly kind of you. I'm glad you like the blog. :) x
DeleteWOW, that is one stunning cake! I've been wanting to try these kind of cakes with things baked in them (there must be a catchier name than that!) for a while. Definitely worth the effort! I think the melted chocolate looks great draped over the top, the thicker the better in my book! Thanks for a such a comprehensive post, makes me feel a bit more confident to try it myself!
ReplyDeleteThanks Kim - glad you found it helpful. Good luck if you do try one! :)
DeleteWhat a great idea for a cake, really effective! I particularly love the shiny chocolate oozing down the sides of the cake. It makes me want to dive straight in. Definitely worth the second attempt!
ReplyDeleteThanks Jo! :)
DeleteWow what a great cake...you've done a great job! It looks so professional and the dots really stand out! I'd love to give this a go...I've got my eye on something similar but I hope it looks as good as yours! :-)
ReplyDeleteThanks Laura! :)
DeleteI love this! It looks so good and yummy at the same time!
ReplyDeleteThanks Lottie! Glad you like it! :)
DeleteYour cake looks amazing! Nice work!!
ReplyDeleteThanks for the link, too!
-Beki
Thanks Beki! :)
Delete